Reading and writing TCF
From WebLichtWiki
Contents[hide] |
Introduction
In order to use an output of a WebLicht tool or to participate in WebLicht's tool-chaining, one must be able to read and/or write TCF. There are two options available:
- The first option is to parse the TCF document, extract the necessary annotations and if building a service, - process them to build new annotations layer, and add new annotations to the document according to the TCF specifications. For creating and parsing TCF, one can use a DOM parser or a StAX parser. A StAX parser is the preferable option in most cases because a DOM parser holds an entire document in memory, while with a StAX parser the developer can decide which pieces of information are saved and how they are saved, having fine control over parsing efficiency and memory use.
- The second option is to use the TCF binding library WLFXB which we offer for the developers and users of WebLicht services. It abstracts from the particular format of TCF and its parsing. The library binds linguistic data, represented by XML elements and attributes in TCF, to linguistic data represented by Java objects accessed from a WLData object, or from it components, - a TextCorpus object (for text corpus based annotations) or a Lexicon object (for dictionary based annotations). The library interface allows for easy access to the linguistic annotations in TCF and easy addition of new linguistic annotations. Thus, one can access/create linguistic annotations from/in a TextCorpus or Lexicon Java object directly, without dealing with XML, the TCF document will be read/written automatically into XML.
This tutorial is devoted to the second option and explains how to use the WLFXB binding library.
Getting started with WLFXB library
WLFXB library is available on GitHub and as a dependency on Maven. To use it in a maven project, for example in NetBeans, do the following:
- File -> New Project -> Maven -> Java Application and click Next
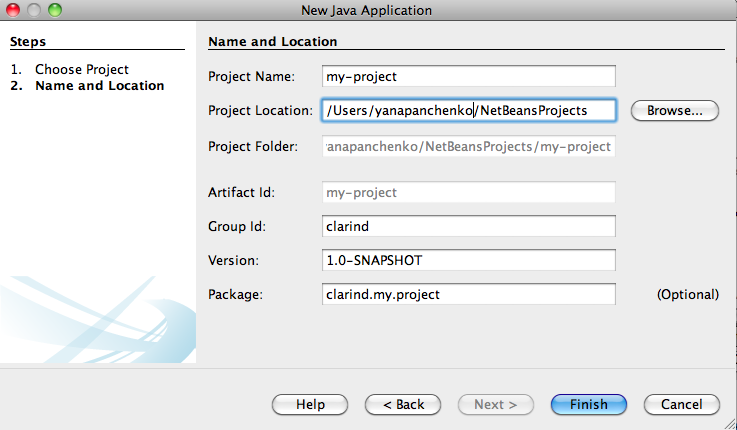
- fill in the name and location of the project and click Finish
- add wlfxb dependency into the project's pom.xml file (change the version to the latest version of wlfxb available at https://search.maven.org/artifact/eu.clarin.weblicht/wlfxb):
   <dependencies>
       <dependency>
           <groupId>eu.clarin.weblicht</groupId>
           <artifactId>wlfxb</artifactId>
           <version>1.4.3</version>
       </dependency>
   </dependencies>
Two use cases are described in the tutorial. Proceed to the one more similar to your own use case:
- Consuming and producing linguistic annotations from/into TCF: you have a TCF input with linguistic annotations, you want to process these annotation and produce new linguistic annotations into the TCF document. This this the most common scenario for a WebLicht service.
- Producing linguistic annotations in TCF from scratch: you want to produce data with linguistic annotations in TCF from scratch. Within WebLicht this scenario is applied when you are implementing a converter from another format to TCF. The scenario is also applicable when you want to make your own data/corpus available to the user in TCF format.
Consuming and producing linguistic annotations from/into TCF
Let's consider an example of part-of-speech tagger that processes tokens sentence by sentence and annotates them with part-of-speech tags. Our tagger will be very naive: it will annotate all the tokens with NN tag. The real tagger would be more itelligent and will assign tag based on the token string, the sentence context, and previous tags. Therefore, the input TCF should contain at least tokens and sentences layers:
<?xml version="1.0" encoding="UTF-8"?>
<?xml-model href="http://de.clarin.eu/images/weblicht-tutorials/resources/tcf-04/schemas/latest/d-spin_0_4.rnc"
            type="application/relax-ng-compact-syntax"?>
<D-Spin xmlns="http://www.dspin.de/data" version="0.4">
	<MetaData xmlns="http://www.dspin.de/data/metadata"></MetaData>
	<TextCorpus xmlns="http://www.dspin.de/data/textcorpus" lang="de">
		<text>Karin fliegt nach New York. Sie will dort Urlaub machen.</text>
		<tokens>
			<token ID="t_0">Karin</token>
			<token ID="t_1">fliegt</token>
			<token ID="t_2">nach</token>
			<token ID="t_3">New</token>
			<token ID="t_4">York</token>
			<token ID="t_5">.</token>
			<token ID="t_6">Sie</token>
			<token ID="t_7">will</token>
			<token ID="t_8">dort</token>
			<token ID="t_9">Urlaub</token>
			<token ID="t_10">machen</token>
			<token ID="t_11">.</token>
		</tokens>
		<sentences>
			<sentence tokenIDs="t_0 t_1 t_2 t_3 t_4 t_5"></sentence>
			<sentence tokenIDs="t_6 t_7 t_8 t_9 t_10 t_11"></sentence>
		</sentences>
	</TextCorpus>
</D-Spin>
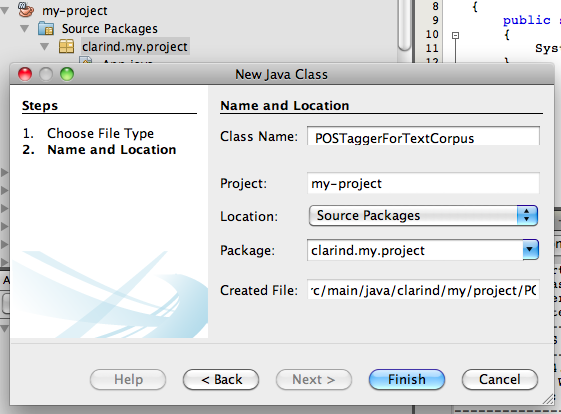
In the project that you've created in previous section, create class POSTaggerForTextCorpus:
package clarind.my.project;

import eu.clarin.weblicht.wlfxb.io.TextCorpusStreamed;
import eu.clarin.weblicht.wlfxb.io.WLFormatException;
import eu.clarin.weblicht.wlfxb.tc.api.PosTagsLayer;
import eu.clarin.weblicht.wlfxb.tc.api.Sentence;
import eu.clarin.weblicht.wlfxb.tc.api.Token;
import eu.clarin.weblicht.wlfxb.tc.xb.TextCorpusLayerTag;
import java.io.FileInputStream;
import java.io.FileOutputStream;
import java.io.InputStream;
import java.io.OutputStream;
import java.util.EnumSet;

public class POSTaggerForTextCorpus {

    public void process(InputStream is, OutputStream os) throws WLFormatException {
        // specify layers to be read for processing
        EnumSet<TextCorpusLayerTag> layersToRead = EnumSet.of(TextCorpusLayerTag.TOKENS, TextCorpusLayerTag.SENTENCES);
        // create TextCorpus object that reads the specified layers into the memory
        TextCorpusStreamed textCorpus = new TextCorpusStreamed(is, layersToRead, os);
        // create empty pos taggers layer for the part-of-speech annotations to be added
        PosTagsLayer posLayer = textCorpus.createPosTagsLayer("STTS");
        // iterate on sentences
        for (int i = 0; i < textCorpus.getSentencesLayer().size(); i++) {
            // access each sentence
            Sentence sentence = textCorpus.getSentencesLayer().getSentence(i);
            // access tokens of each sentence
            Token[] tokens = textCorpus.getSentencesLayer().getTokens(sentence);
            for (int j = 0; j < tokens.length; j++) {
                // add part-of-speech annotation to each token
                posLayer.addTag("NN", tokens[j]);
            }
        }
        // write new annotations into te output and close the tcf streams
        textCorpus.close();
    }

    public static void main(String[] args) throws java.io.IOException, WLFormatException {
        if (args.length != 2) {
            System.out.println("Provide args:");
            System.out.println("PATH_TO_INPUT_TCF PATH_TO_OUTPUT_TCF");
            return;
        }
        FileInputStream fis = null;
        FileOutputStream fos = null;
        try {
            fis = new FileInputStream(args[0]);
            fos = new FileOutputStream(args[1]);
            POSTaggerForTextCorpus tagger = new POSTaggerForTextCorpus();
            tagger.process(fis, fos);
        } finally {
            if (fis != null) {
                fis.close();
            }
            if (fos != null) {
                fos.close();
            }
        }
    }
}
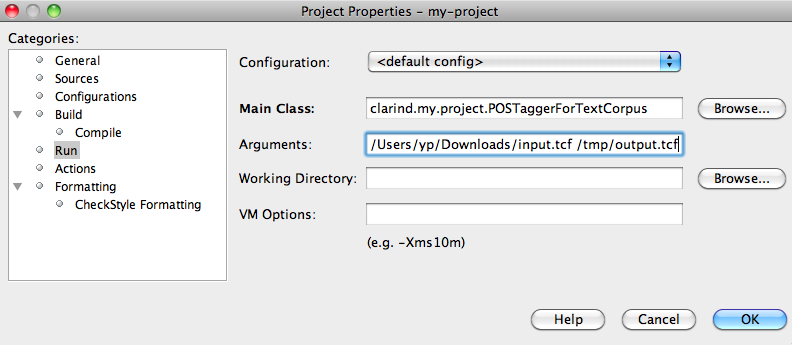
Compile and run the POSTaggingTextCorpus class providing two arguments: input and output TCF files. For example in NetBeans, right click on the project, select Properties -> Run, specify the main class and arguments, click Finish:
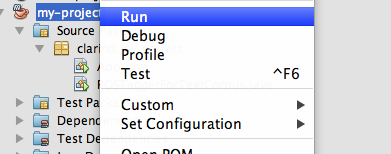
Then right click on the project and select Run:
Inspect the output in the output file you have provided as a second argument to the class. Running the project should produce the valid TCF into the output with POSTags layer added:
<?xml version="1.0" encoding="UTF-8"?>
<?xml-model href="http://de.clarin.eu/images/weblicht-tutorials/resources/tcf-04/schemas/latest/d-spin_0_4.rnc"
            type="application/relax-ng-compact-syntax"?>
<D-Spin xmlns="http://www.dspin.de/data" version="0.4">
	<MetaData xmlns="http://www.dspin.de/data/metadata"></MetaData>
	<TextCorpus xmlns="http://www.dspin.de/data/textcorpus" lang="de">
		<text>Karin fliegt nach New York. Sie will dort Urlaub machen.</text>
		<tokens>
			<token ID="t_0">Karin</token>
			<token ID="t_1">fliegt</token>
			<token ID="t_2">nach</token>
			<token ID="t_3">New</token>
			<token ID="t_4">York</token>
			<token ID="t_5">.</token>
			<token ID="t_6">Sie</token>
			<token ID="t_7">will</token>
			<token ID="t_8">dort</token>
			<token ID="t_9">Urlaub</token>
			<token ID="t_10">machen</token>
			<token ID="t_11">.</token>
		</tokens>
		<sentences>
			<sentence tokenIDs="t_0 t_1 t_2 t_3 t_4 t_5"></sentence>
			<sentence tokenIDs="t_6 t_7 t_8 t_9 t_10 t_11"></sentence>
		</sentences>
		<POStags tagset="STTS">
			<tag tokenIDs="t_0">NN</tag>
			<tag tokenIDs="t_1">NN</tag>
			<tag tokenIDs="t_2">NN</tag>
			<tag tokenIDs="t_3">NN</tag>
			<tag tokenIDs="t_4">NN</tag>
			<tag tokenIDs="t_5">NN</tag>
			<tag tokenIDs="t_6">NN</tag>
			<tag tokenIDs="t_7">NN</tag>
			<tag tokenIDs="t_8">NN</tag>
			<tag tokenIDs="t_9">NN</tag>
			<tag tokenIDs="t_10">NN</tag>
			<tag tokenIDs="t_11">NN</tag>
		</POStags>
	</TextCorpus>
</D-Spin>
Now let's see how the TCF input document is processed and output document is produced. First, we create a TextCorpusStreamed object that will automatically handle TCF reading/writing. To create TextCorpusStreamed object that consumes input TCF and produces output TCF you need to specify annotation layers you want to read from TCF input.
In this example we only read token annotations and sentences annotations in order to assign part-of-speech tags. Only the layer/layers you've specified will be read into the memory, other layer annotations present in the input will be skipped. For example our sample input also contains text layer, but it's not loaded into the memory.
        // specify layers to be read for processing
        EnumSet<TextCorpusLayerTag> layersToRead = EnumSet.of(TextCorpusLayerTag.TOKENS, TextCorpusLayerTag.SENTENCES);
        // create TextCorpus object that reads the specified layers into the memory
        TextCorpusStreamed textCorpus = new TextCorpusStreamed(is, layersToRead, os);
Then we create part-of-speech tags layer (so far empty) and specify the part-of-speech tagset used:
        // create empty pos taggers layer for the part-of-speech annotations to be added
        PosTagsLayer posLayer = textCorpus.createPosTagsLayer("STTS");
Then we can get the data from the layer/layers that you have specified for reading. In our case they are only the sentences and tokens layers. If you try to get other layers that were not specified when constructing TextCorpusStreamed object, or the layers not present in the input, you'll get an Exception.
Then we iterate on sentences tokens and assign a part-of-speech tag to each token, adding it to the TCF:
        for (int i = 0; i < textCorpus.getSentencesLayer().size(); i++) {
            // access each sentence
            Sentence sentence = textCorpus.getSentencesLayer().getSentence(i);
            // access tokens of each sentence
            Token[] tokens = textCorpus.getSentencesLayer().getTokens(sentence);
            for (int j = 0; j < tokens.length; j++) {
                // add part-of-speech annotation to each token
                posLayer.addTag("NN", tokens[j]);
            }
        }
After we have added all the annotations we wanted into the TextCorpusStreamed object, we should close the TextCorpusStreamed object and the TCF document is ready:
textCorpus.close();
It's important to call close() method, so that the new annotations are written into the output stream and both underlying input and output streams are closed.
Producing linguistic annotations in TCF from scratch
Let's consider how to create a new TCF document when you have no TCF input to process. For simplicity in this example, we will hard-code the linguistic annotations to be created. We will create a new TCF document with these linguistic annotations.
The linguistic annotations we are going to add into the TCF are text, token and sentence annotations for the German language ("de"). In the project that you've created in previous section, create class CreatorTextTokensSentencesInTextCorpus:
package clarind.my.project;

import eu.clarin.weblicht.wlfxb.io.WLDObjector;
import eu.clarin.weblicht.wlfxb.io.WLFormatException;
import eu.clarin.weblicht.wlfxb.tc.api.SentencesLayer;
import eu.clarin.weblicht.wlfxb.tc.api.Token;
import eu.clarin.weblicht.wlfxb.tc.api.TokensLayer;
import eu.clarin.weblicht.wlfxb.tc.xb.TextCorpusStored;
import eu.clarin.weblicht.wlfxb.xb.WLData;
import java.io.FileOutputStream;
import java.io.OutputStream;
import java.util.ArrayList;
import java.util.List;


public class CreatorTextTokensSentencesInTextCorpus {

    private static final String myText = "Karin fliegt nach New York. Sie will dort Urlaub machen.";
    private static final List<String[]> mySentences = new ArrayList<String[]>();

    static {
        mySentences.add(new String[]{"Karin", "fliegt", "nach", "New", "York", "."});
        mySentences.add(new String[]{"Sie", "will", "dort", "Urlaub", "machen", "."});
    }

    public void process(OutputStream os) throws WLFormatException {
        // create TextCorpus for German language
        TextCorpusStored textCorpus = new TextCorpusStored("de");
        // create text layer and add text
        textCorpus.createTextLayer().addText(myText);
        // create tokens layer
        TokensLayer tokensLayer = textCorpus.createTokensLayer();
        // create sentences layer
        SentencesLayer sentencesLayer = textCorpus.createSentencesLayer();
        for (String[] tokenizedSentence : mySentences) {
            // prepare temporary list to store this sentence tokens
            List<Token> sentenceTokens = new ArrayList<Token>();
            // iterate token by token
            for (String tokenString : tokenizedSentence) {
                // create token annotation and add it into the tokens annotation layer:
                Token token = tokensLayer.addToken(tokenString);
                // add it into temporary list that stores this sentence tokens
                sentenceTokens.add(token);
            }
            // create sentence annotation and add it into the sentences annotation layer
            sentencesLayer.addSentence(sentenceTokens);
        }
        //write the created object with all its annotations as xml output in a proper TCF format:
        WLData wlData = new WLData(textCorpus);
        WLDObjector.write(wlData, os);
    }

    public static void main(String[] args) throws java.io.IOException, WLFormatException {
        if (args.length != 1) {
            System.out.println("Provide arg:");
            System.out.println("PATH_TO_OUTPUT_TCF");
            return;
        }
        FileOutputStream fos = null;
        try {
            fos = new FileOutputStream(args[0]);
            CreatorTextTokensSentencesInTextCorpus creator = new CreatorTextTokensSentencesInTextCorpus();
            creator.process(fos);
        } finally {
            if (fos != null) {
                fos.close();
            }
        }
    }
}
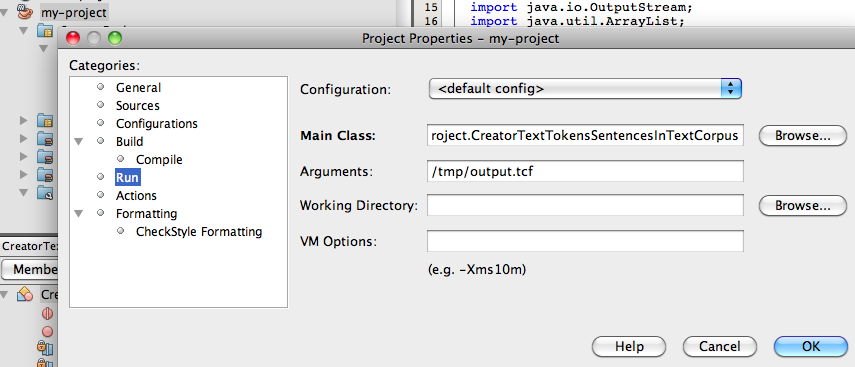
Compile and run the CreatorTextTokensSentencesInTextCorpus class with the argument output TCF file. For example in NetBeans, right click on the project, select Properties -> Run, specify the main class as CreatorTextTokensSentencesInTextCorpus and the file path for TCF output argument, click Finish.
Then right click on the project and select Run:
Inspect the output in the output file you have provided as a second argument to the class. Running the project should produce the valid TCF output that you can inspect in the output TCF file:
<?xml version="1.0" encoding="UTF-8"?>
<?xml-model href="http://de.clarin.eu/images/weblicht-tutorials/resources/tcf-04/schemas/latest/d-spin_0_4.rnc"
			type="application/relax-ng-compact-syntax"?>
<D-Spin xmlns="http://www.dspin.de/data" version="0.4">
<MetaData xmlns="http://www.dspin.de/data/metadata"/>
<TextCorpus xmlns="http://www.dspin.de/data/textcorpus" lang="de">
    <text>Karin fliegt nach New York. Sie will dort Urlaub machen.</text>
    <tokens>
        <token ID="t_0">Karin</token>
        <token ID="t_1">fliegt</token>
        <token ID="t_2">nach</token>
        <token ID="t_3">New</token>
        <token ID="t_4">York</token>
        <token ID="t_5">.</token>
        <token ID="t_6">Sie</token>
        <token ID="t_7">will</token>
        <token ID="t_8">dort</token>
        <token ID="t_9">Urlaub</token>
        <token ID="t_10">machen</token>
        <token ID="t_11">.</token>
    </tokens>
    <sentences>
        <sentence tokenIDs="t_0 t_1 t_2 t_3 t_4 t_5"/>
        <sentence tokenIDs="t_6 t_7 t_8 t_9 t_10 t_11"/>
    </sentences>
</TextCorpus>
</D-Spin>
Now let's look in more detail into the CreatorTextTokensSentencesInTextCorpus to see how the TCF document is created. First, we create a TextCorpusStored object that automatically handles TCF TextCorpus creation from scratch. We specify the language of the data as German (de):
        // create TextCorpus for German language
        TextCorpusStored textCorpus = new TextCorpusStored("de");
Now we can add annotation layers into the document. This is how to add a text layer into TCF:
        // create text layer and add text
        textCorpus.createTextLayer().addText(myText);
In case of more complex annotation layers you would first need to create objects that correspond to these annotation layers and then create/add annotations themselves one by one:
    	TokensLayer tokensLayer = textCorpus.createTokensLayer();
    	tokensLayer.addToken(tokenString1);
    	tokensLayer.addToken(tokenString2);
When all the annotations are added, we write the created object with all its annotations as xml output in a proper TCF format:
        WLData wlData = new WLData(textCorpus);
        WLDObjector.write(wlData, os);
After that, the TCF document is ready.
General remarks on the WLFXB library usage
In similar to the shown in this tutorial way you can add or access any other annotation layers into the document. Some simplified examples for all the layers are available as test cases that you can find in the source code repository on GitHub. TextCorpusLayerTag and LexiconLayerTag enumerations represent all the linguistic layers, available in TCF0.4. If you want to develop a service that produces a layer other than the ones listed, please contact us with the suggestion.
In general the approach of the wlfxb library is the following:
- create/access layers from the corresponding TextCorpus/Lexicon object using the following implementations:
- if you are creating the document from scratch you would commonly use TextCorpusStored/LexiconStored implementation and then write the document using WLDObjector and WLData
- if you are reading all the linguistic data from the document you would commonly use WLDObjector, get from it a TextCorpusStored/LexiconStored object and then get the annotation layers from it
- if you are reading only particular annotation layers from the document, you would commonly use TextCorpusStreamed/LexiconStreamed implementation, so that only the layers you request are loaded into the memory
- a layer method cannot be accessed if you didn't read this layer from input or created this layer yourself
- no more than one layer of a given type within the TCF document can be created
- create and add layer annotations by using the methods from the corresponding layer object
- access the annotations of the layer A via that layer A, e.g.:
       // get the first token
       Token token = textCorpus.getTokensLayer().getToken(0);
       // get the first sentence
       Sentence sentence = textCorpus.getSentencesLayer().getSentence(0);
       // get the first entry
       Entry entry = lexicon.getEntriesLayer().getEntry(0);
       // get the first frequency annotation
       Frequency freq = lexicon.getFrequenciesLayer().getFrequency(0);
- access the annotations of the other layer B referenced from the layer A via this layer A as well, e.g:
       //get all the tokens of the sentence
       Token[] tokens = textCorpus.getSentencesLayer().getTokens(sentence);
       //get tokens of the part-of-speech annotation
       Token[] tokens = textCorpus.getPosTagsLayer().getTokens(pos);
       //get entry of the frequency annotation
       Entry entry = lexicon.getFrequenciesLayer().getEntry(freq)
       //get entries of the part-of-speech annotation
       Entry[] entries = lexicon.getPosTagsLayer().getEntries(pos);
- it is necessary to close TextCorpusStreamed object after finishing reading/writing the required annotations
- apply WLDObjector for writing the object in TCF format if you work with TextCorpusStored/LexiconStored object, and if you are passing the streams to the WLDObjector methods, you should close the streams yourself.
