WebLicht services with JAX-RS tutorial
- how to create a WebLicht service using Java EE API for RESTful Web Services (JAX-RS)
Introduction
Prerequisites
About the sample service
Deploying the sample service
Testing the sample service
Implementing the sample service
Create a RESTful Web Service project in NetBeans IDE
Create a WebLicht service that recognizes named entities
Test the service
Prepare the service for deployment
Adding your service to WebLicht
Recommended reading
Introduction
WebLicht services offer online natural language processing, such as tokenization, part-of-speech tagging, parsing, etc. They make up the infrastructure of interoperable language tools and can be run sequentially to provide a complete linguistic processing chain.
Webservices for the WebLicht toolchain are implemented as RESTful webservices. The input to the service is sent over the web via the POST method of the HTTP protocol. The output of the webservice is the response to that POST event:

In order for the services to be interoperable with each other, a common machine-readable XML-based exchange format called TCF (Text Corpus Format) is used. TCF stores linguistic annotations inside linguistic layers, all of them in one file. That means that during processing within the Weblicht services chain, the file grows. A typical TCF document transformation during the chain processing might look like this:

The WebLicht tool-chaining architecture imposes a few restrictions on services TCF output. A Weblicht service is not permitted to change the linguistic annotations in the input TCF, it can only add new linguistic annotation layers to the document. A WebLicht service is also not allowed to add an annotation layer that already exists in the input document.
This tutorial explains how to develop a WebLicht service in Java with the JAX-RS reference implementation Jersey.
Prerequisites
For running the WebLicht sample service:
- WebLicht tutorial sample
- a command-line tool such as wget or curl (for testing the service);
- Java EE 6 compliant web or application server, such as Tomcat 6.0, GlassFish Server, Jetty, etc.
For following the tutorial:
- NetBeans IDE (Java download bundle, version 6.9+)
- Tomcat 6.0 web server
- TCF0.3 binding library
- sample input TCF0.3 document from the WebLicht tutorial sample
About the sample service
The sample service developed in this tutorial represents a named entity recognizer. In order for this tutorial to focus on the development of the service and handling the input and output of the service, the named entity recognizer itself is kept extremely simple. It assigns named entity annotations by checking against a list of only several names, and therefore cannot be used as-is. However, this sample service can be used as a template for building real services.
Deploying the sample service
If you want to try out the sample service provided in the tutorial:
- Unzip WebLicht tutorial sample. The service itself is packaged as a eb application chive (WAR) file under the name WebLichtServices.war.
- Follow your web server/application server instructions on how to deploy the
web application WAR file.
For example if you are using Tomcat, you can use Tomcat Manager web application user interface at http://localhost:8080/manager/html/ (replace localhost with your website host name) to deploy your application. For that you should have the manager role. Details on all the Tomcat deployment possibilities are described here.
Testing the sample service
- Make sure the sample service is deployed on the running server;
- In a command line, go to the folder of the unzipped WebLicht tutorial sample and make sure a sample TCF document called input.xml is there.
- Run curl command:
 curl -H 'content-type: text/xml' -d @input.xml
                        -X POST http://localhost:8080/WebLichtServices/resources/recognize/ne/tcf03
where you may need to replace localhost:8080 with your website host name; - The output produced by the service will be displayed, it should contain TCF document with the same layers as input.xml plus a new annotations layer called namedEntities.
Implementing the sample service
Now we will develop step by step the WebLicht sample service using NetBeans IDE.
Create a RESTful Web Service project in NetBeans IDE
Create the project:
- In NetBeans IDE, select → .
- From , select . From , select . Click
- Type a project name, , and click .
- Make sure the server Server is selected.
If you don't have Tomcat server among the options, you need to add it: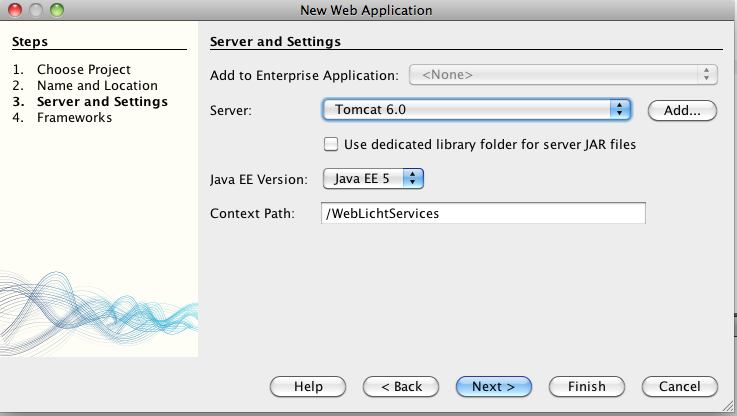
- click ;
- select and follow the wizard to set up Tomcat connection and configuration.
- Click .
- Right-click the project and select , then select .
- Select and click .
- Type a name, weblicht.services
- Type recognize/ne/tcf03 in the field.
Type RecognizeNamedEntities in the field.
For , select
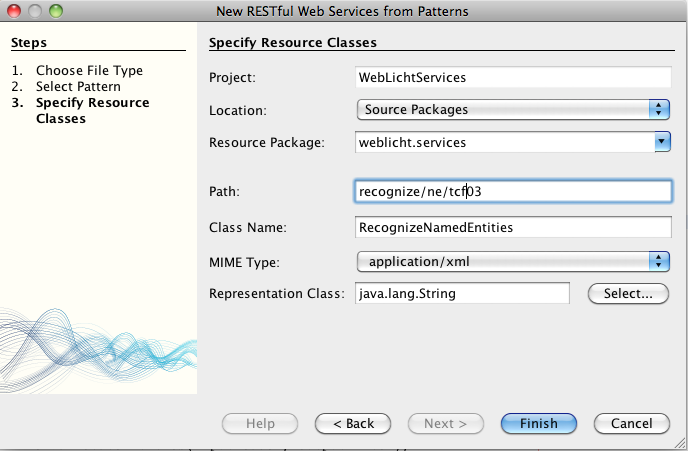
- Click , on the REST Resources Configuration page click .
A new resource, RecognizeNamedEntities.java, is added to the project and appears in the Source pane. This file provides a template for creating a RESTful web service that we will modify to create a WebLicht service.
Create a WebLicht service that recognizes named entities
1. Add TCF0.3 binding libraries to the project:
- Download TCF0.3 binding library TCFXB0.3.
- Right-click the project and select → .
- Click and point to the downloaded
tcfxb-0_3-d.jar file.
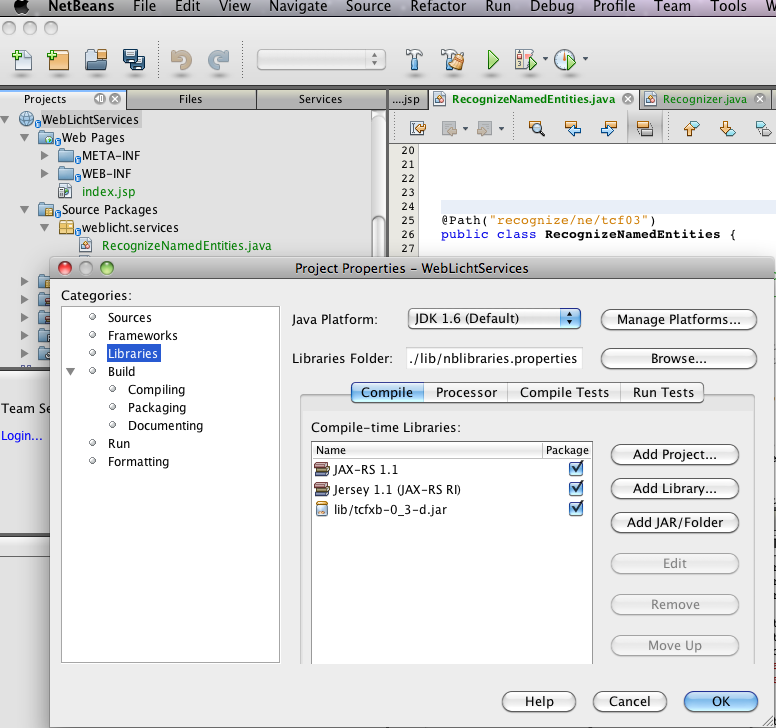
- Click .
2. Create class that represents our simplified named entity recognizer:
- Right-click the project's weblicht.services package and select , then select .
- Type Recognizer in the Class Name field.
- Click .
- Add the folowing code:
package weblicht.services; import de.tuebingen.uni.sfs.dspin.tcf.data.Entity; import de.tuebingen.uni.sfs.dspin.tcf.data.LayerTag; import de.tuebingen.uni.sfs.dspin.tcf.data.TextCorpusData; import de.tuebingen.uni.sfs.dspin.tcf.data.TextCorpusFactory; import de.tuebingen.uni.sfs.dspin.tcf.data.TextCorpusFormatException; import de.tuebingen.uni.sfs.dspin.tcf.data.Token; import java.io.Reader; import java.io.Writer; import java.util.ArrayList; import java.util.HashSet; import java.util.List; import java.util.Set; class Recognizer { private static final SetknownPERNames = new HashSet (); static { knownPERNames.add("Karin"); knownPERNames.add("Peter"); } void annotateEntities(Reader inputReader, Writer outputWriter) throws IllegalAccessException, TextCorpusFormatException { LayerTag[] layersToRead = new LayerTag[] { LayerTag.TOKENS }; LayerTag[] layersToWrite = new LayerTag[] { LayerTag.NAMED_ENTITIES }; TextCorpusData textCorpus = new TextCorpusData(inputReader, layersToRead, outputWriter, layersToWrite); TextCorpusFactory textCorpusFactory = textCorpus.getFactory(); List entities = new ArrayList (); for (Token token : textCorpus.getTokensLayer().getTokens()) { if (knownPERNames.contains(token.getTokenString())) { Entity personEntity = textCorpusFactory.createEntity("PER", token.getID()); entities.add(personEntity); } } textCorpus.writeNamedEntitiesLayer(entities); } }
The above class has a method to recognize named entities (person named entities) in the TCF0.3 input,
given that the input has tokens layer annotations. The TCF0.3 input
comes from the input stream provided in the method parameter. If the input TCF0.3 does not
contain a tokens layer, or does not comply with the TCF0.3 specification,
an exception will be thrown. The recognized named entities are added as namedEntities
layer into the output TCF0.3 that is being written into the output stream. The output stream is
provided in the second method parameter.
This code uses the binding library TCFXB0.3 for reading and adding the layers from/into
TCF0.3 documents. You can read more about this library
here.
You are also free to use your own mechanism to
read/write data from/into TCF, e.g. using a StAX parser.
3. Open RecognizeNamedEntities.java that was generated by NetBeans and modify it in the following way:
- Create a ServletContext instance variable with the @Context annotation, and a String constant
RECOGNIZER_ATTRIBUTE class variable:
	@Context ServletContext servletContext;
	public static final String RECOGNIZER_ATTRIBUTE = "recognizer";
- Delete the constructor and the putXml() method.
- Replace the String getXml() method and its parameters with String addNamedEntitiesLayer(File file) method
- Replace the @GET annotation of addNamedEntitiesLayer method with @POST annotation.
- Add @Consumes("text/xml") annotation.
- Change the @Produces("application/xml") annotation to @Produces("text/xml")
- Inside addNamedEntitiesLayer method, replace the
TODO comment and the exception with the code that processes the input
TCF and adds a named entities annotation layer to the output stream:
@POST @Produces("text/xml") @Consumes("text/xml") public String addNamedEntitiesLayer(File file) throws IOException { Reader inputReader = new InputStreamReader(new FileInputStream(file), "UTF-8"); StringWriter outputWriter = new StringWriter(); synchronized (servletContext) { // we use only one instance of recognizer for all the clients Recognizer ner; if (servletContext.getAttribute(RECOGNIZER_ATTRIBUTE) == null) { ner = new Recognizer(); servletContext.setAttribute(RECOGNIZER_ATTRIBUTE, ner); } else { ner = (Recognizer) servletContext .getAttribute(RECOGNIZER_ATTRIBUTE); } try { ner.annotateEntities(inputReader, outputWriter); } catch (IllegalAccessException e1) { ResponseBuilder builder = Response.status( Response.Status.BAD_REQUEST).entity( "Input layers/elements missing!"); throw new WebApplicationException(builder.build()); } catch (TextCorpusFormatException e2) { ResponseBuilder builder = Response.status( Response.Status.BAD_REQUEST).entity( "XML/TCF0.3 format problem in input!"); throw new WebApplicationException(builder.build()); } } return outputWriter.toString(); } - Right-click and choose from the drop-down list, then click
Now the modified RecognizeNamedEntities class, a RESTful web service (or resource in RESTful terminology) represents a WebLicht service that produces named entity annotations. Let's look at it in more detail.
The RecognizeNamedEntities class is generated automatically by NetBeans based on the class name that we specified in the form when creating a new . The path value we entered in that form is used in the @Path annotation. The @Path annotation is a relative URI path where the resource is hosted. In this case, the Java class will be hosted at the relative URI path recognize/ne/tcf03. It means it will be available at the full URI: http://localhost:8080/WebLichtServices/resources/recognize/ne/tcf03 (replace localhost:8080 by your server host name).
The method addNamedEntitiesLayer we annotated with the @POST annotation. It means that this method will be called whenever a client makes an HTTP POST request to http://localhost:8080/WebLichtServices/resources/recognize/ne/tcf03
The @Consumes annotation means that our resource expects the client to send some input, namely TCF document. TCF format is XML, so we put "text/xml" in accepted media types. To read in that input we use java.io.File that we provided in the method parameter. java.io.File is just one of Java types for which JAX-RS supports marshalling. Using File vs. String, InputStream or Reader will allow us to receive and proccess big TCF files from the client requests.
The @Produces annotation means that our resource, after processing the client request, will send some output to the client. We output a TCF document with a new annotation layer added, therefore we again put "text/xml" media type. The output comes into the method return parameter value. We use String as return parameter, i.e. we will return TCF output as String, this String will be sent to the response output stream sent to the client. Another alternative, which would make it possible to output very large data, is to use StreamingOutput implementation and write directly to the response output stream. More about JAX-RS mappping of HTTP Response and Request Entity Bodies to specific Java types can be found in "RESTful Java with Jax-RS" by Bill Burke.
Inside the method we create Reader for reading the input stream from java.io.File object. This java.io.File object will be created from the client request and will be injected by the JAX-RS runtime. We also create StringWriter object that we will use to write the output of the named entity recognizer.
Next, we obtain an instance of Recognizer class and run it on our input producing the output. If our recognizer would be a real one, for example one based on a machine learning model, its initialization could be an expensive operation and the memory requirements could also be high. In that case it is better to initialize the heavy-weighted objects only once, so that only one (or a limited pool) of their instances serve all the clients. That's why in the sample we initialize the recognizer only the first time the service is called by a client. We assign it as an attribute to the servletContext and all the later calls will use an already existing instance of Recognizer from the context.
In case the named entity recognizer is not multithread safe, we would also want to make sure that only one client has access to it at any given time. That's why we use it inside a synchronized block.
Note that if your objects needed for serving client requests are light-weighted and you can afford creating separate instances of these objects for each client request, you don't need to use servletContext and don't need to worry about syncronization.
Additionally, we handle checked exceptions that may happen during processing by building a response containg HTTP error code and a message explaining the problem. We rethrow provided by JAX-RS unchecked exception WebAllicationException with the error response we built. WebLicht requires to use HTTP error codes to report an error and encourages to provide meaningful messages for the error source whenever possible.
Finally, we return String obtained from StringWriter that holds the output of named entity recognition. This String will be streamed to the client.
Test the service
To test the service with the help of NetBeans:
- Get the sample input TCF document (input.xml) from WebLicht tutorial sample
- Right-click the project node and click .
- This step deploys the application and brings up a test client in the browser.
- When the test client appears, select the recognize/ne/tcf03 resource in the left pane:
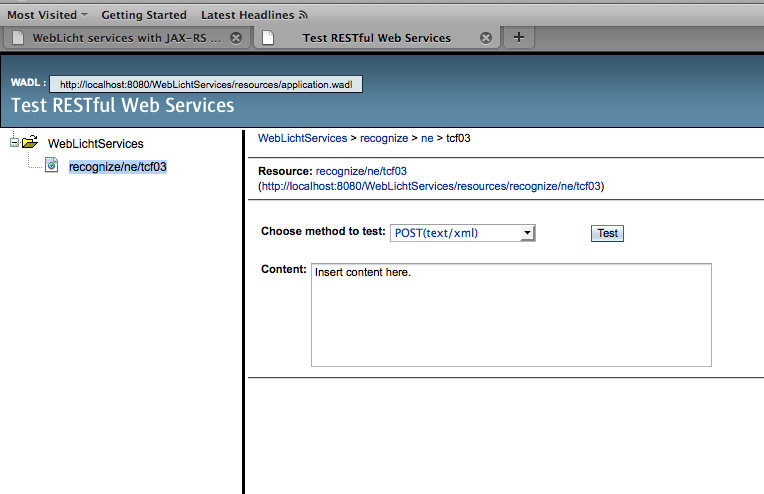
- Copy and paste content of input.xml file into the field.
- To call the service click the button in the right pane.
- The service will produce output that you could see in the
window below:
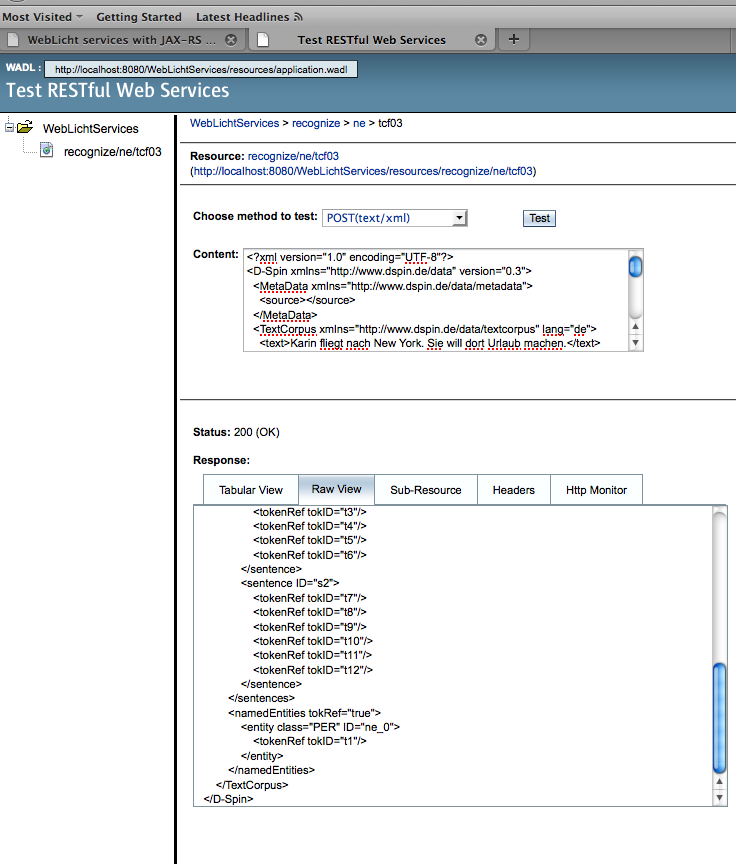
You can see that the token that has id "t1" ("Karin" token) was identified as PER (person) named entity, and the new layer, namedEntities, is added to the output TCF.
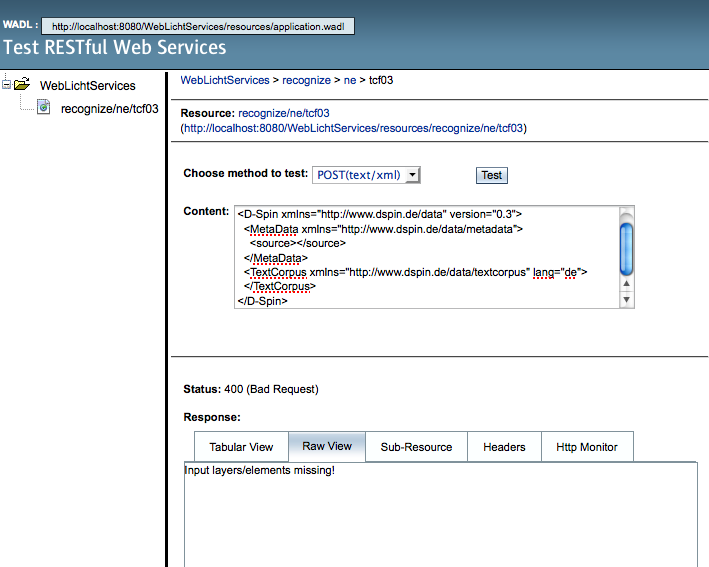
The test client provided by NetBeans is also good to test error responses. For example, our recognizer requires tokens layer in input. Removing the tokens layer from the input and clicking correctly produces Bad Request error (HTTP status 400) and error message pointing to the problem:
Prepare the service for deployment
To deploy your web application on the web server and make it available you need to package it as WAR file. WAR file is just a JAR file used to distribute a collection of JavaServer Pages, servlets, Java classes, XML files, tag libraries and static Web pages (HTML and related files) that together constitute a Web application. With NetBeans you can package your web application as WAR in the following way:
- Right-click the project node and click .
- Go to the window, then double click on folder, then double click on folder.
- You will see that WebLichServices.war file was created.
- Follow your server instructions to deploy WebLichServices.war.
- After that it will be accesable per HTTP POST method at http://localhost:8080/WebLichtServices/resources/recognize/ne/tcf03 (replace localhost:8080 with your server host name and port in the URL)
Adding your service to WebLicht
Once you have developed a service and deployed in on your server making it available, you will need to register it in the WebLicht repository, which will make it available in the WebLicht web application. Please contact the D-Spin development group at: weblicht at d-spin dot org for registering your service.
In case your service produces an annotation layer, that is not part of TCF specification, contact the D-Spin development group at weblicht at d-spin dot org, so that the new annotation layer could be added into the specification.
Recommended reading
1. "RESTful Java with Jax-RS" by Bill Burke
2. Java EE6 Tutorial Building RESTful Web Services with JAX-RS http://download.oracle.com/javaee/6/tutorial/doc/giepu.html

